Using TypeScript to Generate a Map with Cellular Automata
This is an example of how to use TypeScript in NodeJS and generate cellular automata on a map and render it with console or with a normal JavaScript node library.
As our sample node library we will be using blessed to render the map in a colorful terminal prompt in addition to a standard console.log.
Setup
Our directory structure will look like:
build/
node_modules/
src/
  main.ts
  main-blessed.ts
  map.ts
package-lock.json
tsconfig.json
The contents of our tsconfig.json file includes a standard build process that takes all in src/ and outputs it to JS in build/.
{
  "compilerOptions": {
  "outDir": "./build",
  "allowJs": true,
  "target": "es5",
  "types": ["node"]
  },
  "include": ["./src/**/*"]
}
We are going to install two node packages:
npm install @types/nodeso that the TypeScript compiler knows how to use NodeJS librariesnpm install blessedso we can render- If you have not installed typescript do so globally with
npm install -g typescriptso we can compile withtsc
Map Module
We will start by defining the map module in TypeScript that includes the Map and Cell classes that we will use to simulate a map and generate cellular automata with.
In src/map.ts
// Cell class is a single cell in our map and has an
// index on our parent map as well as row, column and
// value
export class Cell {
  index: number;
  r: number;
  c: number;
  value: number = 0;

  constructor(index: number, r: number, c: number) {
    this.index = index;
    this.r = r;
    this.c = c;
  }
}

// Represents a map of rows and columns and contains
// a set of Cells to represent values
// Can initialize them to empty or run cellular
// automata against them
export class Map {
  rows: number;
  columns: number;
  cells: Cell[];

  constructor(r: number, c: number) {
    this.rows = r;
    this.columns = c;
    this.cells = [];

    let i: number = 0;
    for (let r: number = 0; r < this.rows; r++) {
      for (let c: number = 0; c < this.columns; c++) {
      this.cells.push(new Cell(i, r, c));
      i++;
      }
    }
  }

  public clear() {
    for (let r: number = 0; r < this.rows; r++) {
      for (let c: number = 0; c < this.columns; c++) {
      let index = r * this.columns + c;
      this.cells[index].value = 0;
      }
    }
  }

  public toString() {
    let p = '';
    for (let r = 0; r < this.rows; r++) {
      for (let c = 0; c < this.columns; c++) {
      let index = r * this.columns + c;
      if (this.cells[index].value == 0)
        p += '  ';
      else
        p += this.cells[index].value + ' ';
      }
      p += "\n";
    }
    return p;
  }

  // Main entry point for running cellular automata
  public cellify(aliveChance: number = 0.4, deathMax: number = 3, birthMax: number = 4, steps: number = 2): void {
    this.cellInit(aliveChance)
    for (let i: number = 0; i < steps; i++) {
      this.cellSimulate(deathMax, birthMax);
    }
  }

  private cellInit(aliveChance: number) {
    for (let r: number = 0; r < this.rows; r++) {
      for (let c: number = 0; c < this.columns; c++) {
      let index = r * this.columns + c;
      if (Math.random() < aliveChance)
        this.cells[index].value = 1;
      else
        this.cells[index].value = 0;
      }
    }
  }

  private cellSimulate(deathMax: number, birthMax: number) {
    for (let r = 0; r < this.rows; r++) {
      for (let c = 0; c < this.columns; c++) {
        let index = r * this.columns + c;
        let nbs = this.cellCountAliveNeighbors(r, c);
        if (this.cells[index].value > 0) {
          // See if it should die or stay solid
          if (nbs < deathMax)
            this.cells[index].value = 0;
          else
            this.cells[index].value = 1;
        } else {
          //See if it should become solid
          if (nbs > birthMax)
            this.cells[index].value = 1;
          else
            this.cells[index].value = 0;
        }
      }
    }
  }

  private cellCountAliveNeighbors(r: number, c: number): number {
    let count = 0;
    for (let i = -1; i < 2; i++) {
      for (let j = -1; j < 2; j++) {
        let nbx = i+c;
        let nby = j+r;
        let nbindex = nby * this.columns + nbx;
        if (i == 0 && j == 0)
          continue;
        //If it's at the edges, consider it to be solid (you can try removing the count = count + 1)
        if (nbx < 0 || nby < 0 || nbx >= this.columns || nby >= this.rows)
          count = count + 1;
        else if (this.cells[nbindex].value == 1)
          count = count + 1;
      }
    }
    return count;
  }
}
Main with Logging
Once we have our map module built we can import it into a script and log its output
In src/main/ts:
import { Map } from './map';

let map = new Map(24, 24);
map.cellify();
console.log(map.toString());
Will output something like:
1 1 1 1 1 1 1 1 1 1 1 1 1 1 1 1 1 1 1   1 1 1 1
1 1 1 1 1 1 1 1 1 1 1 1 1 1 1 1           1 1 1
1 1 1 1 1 1 1 1 1 1 1 1 1 1 1 1           1 1 1
1 1 1 1 1 1 1 1 1 1 1 1 1 1 1 1 1         1 1 1
1 1 1 1 1 1   1 1 1 1 1 1 1 1 1 1 1     1 1 1 1
1 1 1           1 1 1 1 1 1 1 1 1     1 1 1 1 1
1 1             1 1 1 1 1 1 1 1 1 1 1 1 1 1 1 1
1 1             1 1 1 1 1 1 1 1 1 1 1 1 1 1 1 1
1 1             1 1 1 1     1 1 1 1 1 1 1 1 1 1
1 1 1           1 1 1         1 1 1 1 1 1 1 1 1
1 1 1 1         1 1 1         1 1 1 1 1 1 1 1 1
1 1 1 1           1 1 1       1 1     1 1 1 1 1
1 1 1               1 1 1 1 1           1 1 1 1
1 1                 1 1 1 1 1             1 1 1
1 1                 1 1 1 1 1             1 1 1
1 1 1               1 1 1 1 1 1         1 1 1 1
1 1                   1 1 1 1 1         1 1 1 1
1 1                     1 1 1 1       1 1 1 1 1
1 1                     1 1 1 1       1 1 1 1 1
1 1                     1 1 1 1       1 1 1 1 1
1 1                     1 1 1 1 1           1 1
1             1 1       1 1 1 1 1             1
1 1         1 1 1 1 1 1 1 1 1 1 1 1           1
1 1 1 1 1 1 1 1 1 1 1 1 1 1 1 1 1 1 1       1 1
Cool!
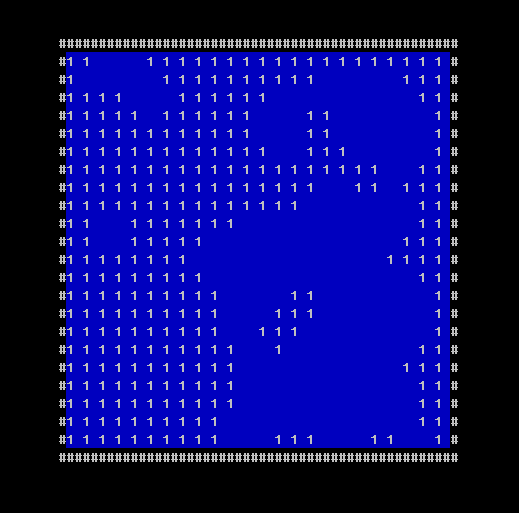
Main with Blessed
Now we can make this a little richer by rendering it in a pseudo terminal window with the package blessed just to see how to use JS node modules in a TypeScript application.
In src/main-blessed.ts:
import { Map } from './map';
import * as blessed from 'blessed';

let map = new Map(24, 24);
map.cellify();

// Create a screen object.
var screen = blessed.screen({
  smartCSR: true
});
screen.title = 'my window title';

// Create a box perfectly centered horizontally and vertically.
var box = blessed.box({
  top: 'center',
  left: 'center',
  width: map.columns * 2,
  height: map.rows,
  content: map.toString(),
  tags: true,
  border: {
    type: 'bg',
    ch: '#',
    fg: 1,
    bg: 'cyan',
  },
  style: {
    fg: 'white',
    bg: 'blue',
    border: {
      fg: '#FFF'
    }
  }
});

// Append our box to the screen.
screen.append(box);

// Quit on Escape, q, or Control-C.
screen.key(['escape', 'q', 'C-c'], function(ch, key) {
  return process.exit(0);
});

box.key('enter', function(ch, key) {
  map.cellify();
  box.setContent(map.toString());
  screen.render();
});

// Render the screen.
screen.render();
And now it will render the map in a blue box. Each time we press enter it will generate a new map.