tOSty Functional Chatbot (Pre-AI)
In the late 2010s I created a functional chatbot capable of taking input as either text commands or voice commands, converting them into functional actions, performing those actions then replying to those actions with a visualized AI agent in the form of a Toaster that spoke to you in a real voice with synchronized mouth movements — all before the advent of AI.
I called this agent tOSty.
tOSty consisted of the following toolset:
- Presentation using Apache and PHP based web application.
- Websocket connection with fallback to polling endpoint.
- Microphone integration with browser.
- AWS Lex speech-to-text and text-to-action chat generation and rules.
- AWS Polly text-to-speech conversion to generate audio for tOSty output.
- AWS Lambda for functional capability of bot.
- FFMPEG audio resampling.
- Apache websocket proxy and reverse-proxy.
- PHP Ratchet websocket server for streaming input and output in realtime.
- HTML Canvas rendering.
- Viseme interpretation and mouth-movement synchronization.
With all of these elements combined anytime we wished to expand the capablity of tOSty we could add a Lambda function in AWS and wire up the relevant AWS Lex chat rules to trigger those. It could also simply output responses from events not initiated by the user acting as a personal agent that would notify the connected client of any ongoing process changes running externally.
It facilitated inline-actions using synchronous HTTP posts made via Ajax and facilitated push events from the server via websockets or Ajax polling.
Below are the breakdowns of its constituent parts that came together to create our semi-living toaster coding friend.
AWS Lambda Functions
Before we get into how the bot interacts with the user lets define our actual functions we want the bot capable of performing. These have no other dependencies in our application and serve as a good starting point.
I created AWS Lambda functions using Python version 3.7 that were roughly designed around asking basic programming or website lookup information as a starting point. These included:
- Getting DNS records for any domain or subdomain.
- Converting HEX color values to RGB values and vice-versa.
- Asking for the HTTP status code definition.
- Getting whois registrar information about a domain.
- Getting TTFB (Time to First Byte) for a page load.
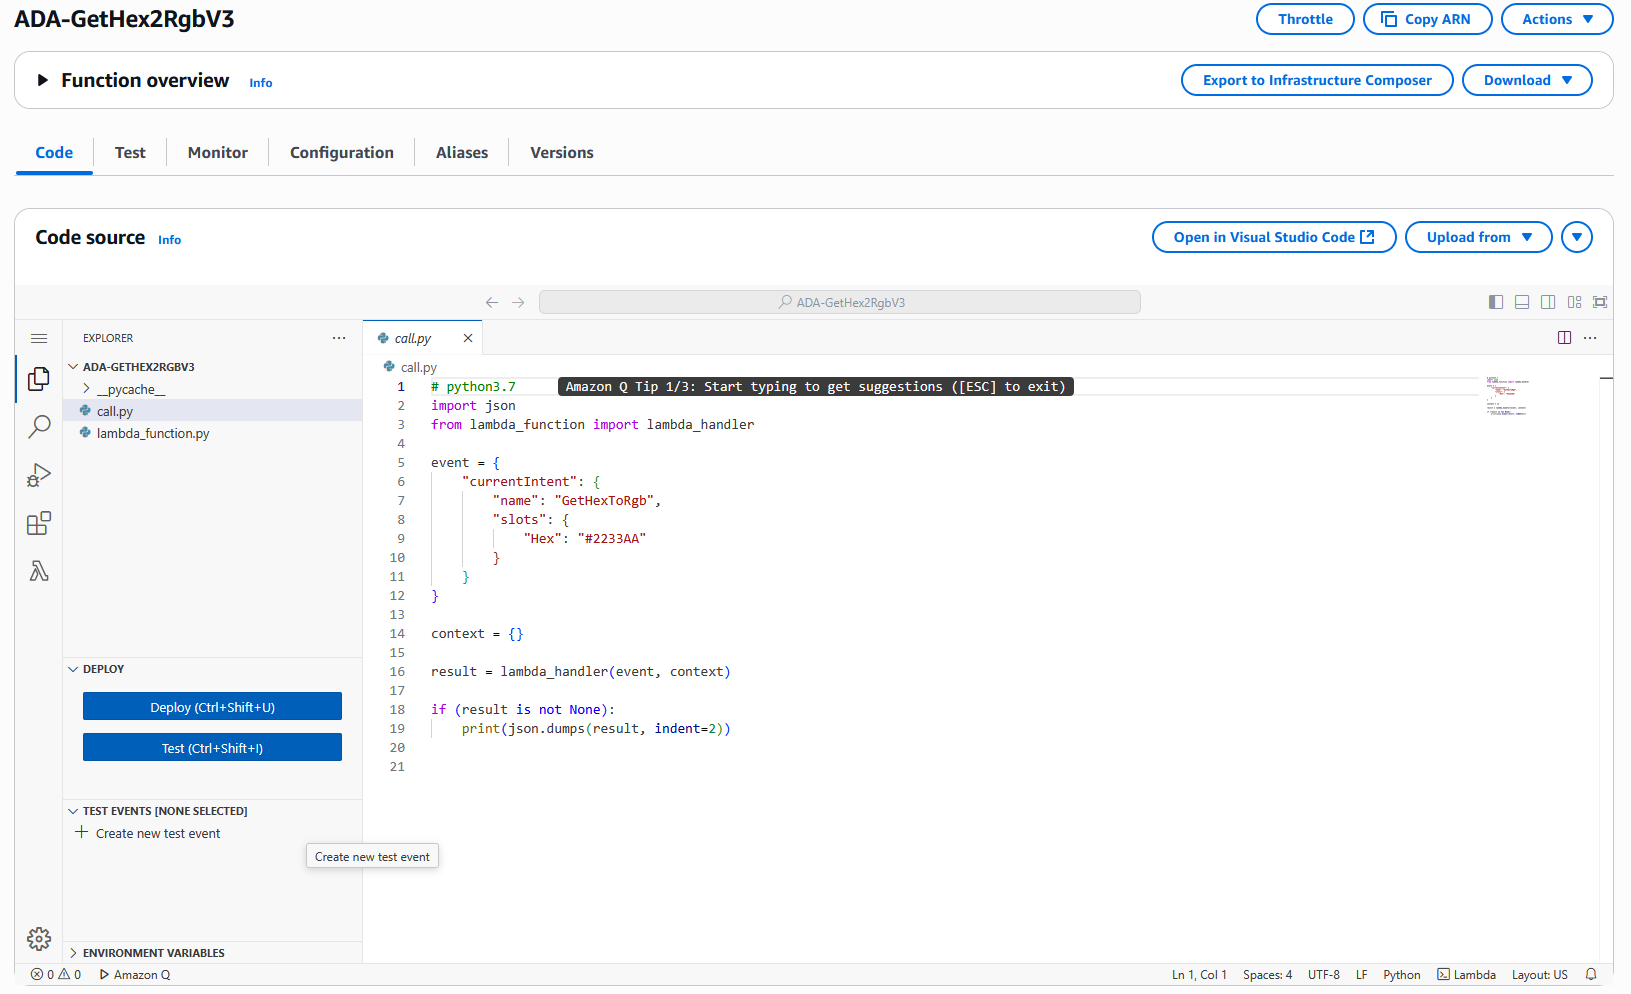
Example HEX Color to RGB Values
I created a script called lambda_function.py which stored the actual function that
took the AWS Lambda event and context, converted it to input paramaters and then
ran the functional logic on it and returned it as output.
import json

# View Logs at Cloudwatch > Logs > Log Groups
def lambda_handler(event, context):

    # Get Lex request details
    intent_request = event;
    intent_name = intent_request['currentIntent']['name']
    if (intent_name == 'GetHexToRgb'):

        h = get_slots(intent_request)['Hex']
        if h is None:
            return {
                'dialogAction': {
                    'type': 'ElicitSlot',
                    'intentName': intent_name,
                    'slots': get_slots(intent_request),
                    'slotToElicit': 'Hex',
                    'message': {
                        'contentType': 'PlainText',
                        'content': 'What hex code?'
                    }
                }
            }

        # convert to rgb
        h = h.lstrip('#')
        rgb = tuple(int(h[i:i+2], 16) for i in (0, 2, 4))

        return close(str(rgb[0]) + ', ' + str(rgb[1]) + ', ' + str(rgb[2]))

    return close("Wrong intent wired to lambda handler")

def close(message):
    return {
        'dialogAction': {
            'type': 'Close',
            'fulfillmentState': 'Fulfilled',
            'message': {
                'contentType': 'PlainText',
                'content': message
            }
        }
    }

def get_slots(intent_request):
    return intent_request['currentIntent']['slots']
This script was then loaded into AWS Lambda via the Console or a simple bash script that zipped the lambda contents and uploaded via aws-cli:
#!/bin/bash

FUNC="$1"

if [ ! -d "$FUNC" ]; then
    echo "$FUNC not dir"
    exit 1
fi

# create zip
pushd $FUNC
zip -r ../${FUNC}.zip .
popd

# upload zip to function in lambda
aws lambda update-function-code --function-name "$FUNC" --zip-file "fileb://${FUNC}.zip"

rm ${FUNC}.zip
This is the UI of AWS showing the lambda installed:
AWS Lex Chatbot Rules
Unfortunately at the time of writing this article (several years after creation of the Bot) my AWS Lex bot is no longer around. I sunsetted it years ago to offload some of the cost of my personal projects.
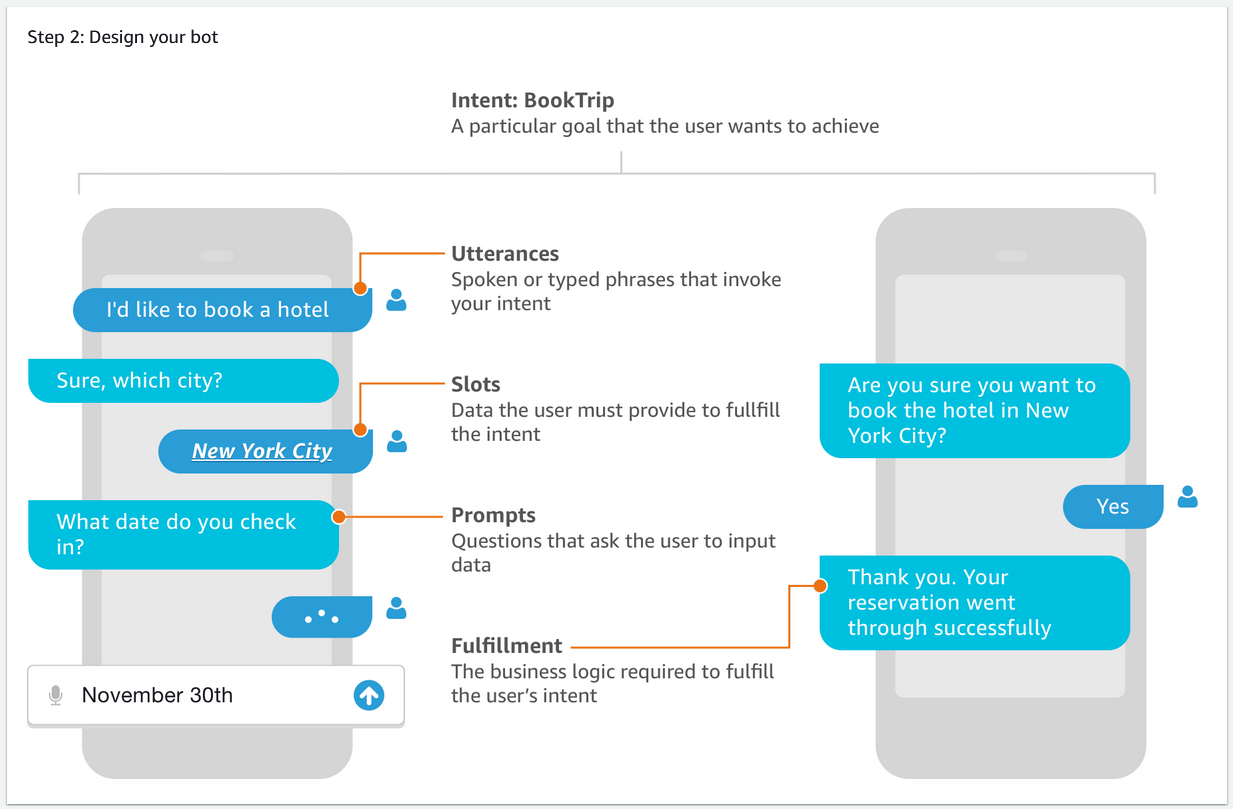
AWS Lex (v1) was capable of defining inputs as utterances and series of rules that would allow you to designate what actions or responses the chatbot would provide. It has the capability of taking input as either:
- Text
- WAV audio
It would then parse this information and weigh it against your rules to determine the proper response and integrating with your Lambda would be able to provide output back to the integration.
Here is a snippet of code from our server that submitted a user's text command to our Lex bot:
<?php

namespace Ada;

class TextInquiry extends Inquiry
{
    public function __construct($text, $clientId)
    {
        // send it to lex to get the inquiry response
        $clientLex = new \Aws\LexRuntimeService\LexRuntimeServiceClient([
            'version' => 'latest',
            'region' => 'us-east-1'
        ]);
        $result = $clientLex->postText([
            'botAlias' => 'alpha',
            'botName' => 'ADA',
            'inputText' => $text,
            'userId' => $clientId,
        ]);
        $this->lex = $result->toArray();
        $this->transcript = $result['inputTranscript'];
        $this->message = $this->parseMessageFromLex($result);;
    }
}
Our TextInquiry class also had a sister class AudioInquiry which took a streamed set of browser microphone
data and uploaded it to Lex:
<?php

namespace Ada;

class AudioInquiry extends Inquiry
{
    public function __construct($blob, $clientId)
    {
        $this->blob = $blob;

        // save the recording locally and downsample it
        file_put_contents("/tmp/recording.wav", $this->blob);
        $shell1 = shell_exec("ffmpeg -y -i /tmp/recording.wav -ar 16000 /tmp/recordingdownsampled.wav 2>&1");

        // send it to lex to get the inquiry response
        $clientLex = new \Aws\LexRuntimeService\LexRuntimeServiceClient([
            'version' => 'latest',
            'region' => 'us-east-1'
        ]);
        $result = $clientLex->postContent([
            'botAlias' => 'alpha',
            'botName' => 'ADA',
            'contentType' => 'audio/l16; rate=16000',
            'inputStream' => file_get_contents("/tmp/recordingdownsampled.wav"),
            'userId' => $clientId,
        ]);
        $this->lex = $result->toArray();
        $this->transcript = $result['inputTranscript'];
        $this->message = $this->parseMessageFromLex($result);;

        unlink("/tmp/recording.wav");
        unlink("/tmp/recordingdownsampled.wav");
    }
}
Both of these classes extended the same super class that handled what to do with the output from Lex. The core of that class only really parsed out the response from Lex in a consistent manner to provide to our server.
protected function parseMessageFromLex($lex)
{
    // write the response to the polling data
    $message = 'It appears as if my intent '. $lex['intentName'] .' is misconfigured.';
    if (!empty($lex['message'])) {
        // see if its raw or a collection of responses
        $responses = json_decode($lex['message'], 1);
        if ($responses) {
            $vals = [];
            foreach ($responses['messages'] as $r) {
                $vals[] = $r['value'];
            }
            $message = preg_replace('/[.]{2}/', '.', implode(". ", $vals));
        } else {
            $message = $lex['message'];
        }
    }

    return $message;
}
Presentational Canvas and Form
Now that we had the AWS services built and some code to send input and parse output the brain of tOSty was completed. We turned our attention to the presentation of the bot so that we could interact with the user in a browser.
I wanted him to have personality so we created a pixelated toaster that rendered in these layers:
- A canvas made the backdrop with fun visualizations for tOSty to sit on top of. The effects of the background would change based on the state of tOSty (e.g. errors or successes).
- We wanted to be capable of animating his mouth in response from Lex results so we rendered him as independent image layers using HTML that sat above the Canvas.
- We created an inline form for user input and rendering output.
The core of the HTML was this:
<!-- background render -->
<canvas class="canvas-bg"></canvas>

<!-- microphone button -->
<div id="toppanel">
    <div id="logo">tOSty</div>
    <div class="panel-action"><button id="record" class="recordButton">Listen</button></div>
</div>

<div class="container">
    <div id="leftpanel" class="panel">

        <!-- text input form -->
        <form id="terminalform" autocomplete="off">
            <div class="terminal">
                <div class="input" autocomplete="off"><input id="terminalInput" type="text" autofocus></div>
                <div class="input-submit"><button>Send</button></div>
            </div>
        </form>

        <!-- bot text output panel -->
        <div id="data-output"></div>
    </div>

    <!-- layers of tosty's face -->
    <div id="rightpanel" class="panel">
        <div class="face" id="mouth">
            <img src="toasty-mouthopen.png" class="open" id="open" style="display:none;">
            <img src="toasty-mouthclosed.png" class="closed" id="closed" >
            <img src="toasty-base.png" class="base" id="base">
            <img src="toasty-baseshut.png" class="base" id="baseshut" style="display:none;">
            <img src="toasty-baseleft.png" class="base" id="baseleft" style="display:none;">
        </div>

        <!-- live subtitles of response -->
        <div id="subtitles"></div>
    </div>
</div>
Submitting Requests
I wanted to be able to send requests from the user down to the server in two main methods
- Text submission as a command.
- Audio submission as a command.
In either scenario we are submitting the information via a POST to the server to a dedicated endpoint that would process the instructions and queue to the Lex Bot to process. These do not actually send information through the websocket (we will setup next) but directly using HTTP freeing us up to use websockets or ajax polling to deal only with server side responses.
Syncrhonous Text Submission
The Text Prompt took on life with this Javascript:
/// TERMINAL PROMPT
var cmdList = [];
var cmdPointer = -1;
var em_terminalForm = document.getElementById("terminalform");
var em_terminalInput = document.getElementById("terminalInput");
em_terminalForm.addEventListener("submit", function(e) {
    e.preventDefault();
    var data = {
        clientId: clientId,
        text: em_terminalInput.value.trim()
    };

    if (data.text == '')
        return;

    logData("SendPrompt", data);
    cmdList.push(data.text);
    cmdPointer = -1;
    em_terminalInput.value = '';

    // submit the text prompt to the server via HTTP POST
    ajax("POST", "request-submit-text.php", data, true, function(status, responseText) {
        try {
            var response = JSON.parse(responseText);
            switch (status) {
            case 200:
                if (response == null)
                    return;
                // handle response from server
                logData("LexResponse", response.lexPretty);
                break;
            default:
                console.warn(status, response);
                break;
            }
        } catch (e) {
            console.warn(status, responseText, e);
        }
    }.bind(this));
});

/// TERMINAL UP/DOWN RE-PROMPT
em_terminalInput.addEventListener("keyup", function(e) {
    if (e.key == 'ArrowUp' && cmdList.length > 0) {
        cmdPointer--;
        if (cmdPointer < 0)
            cmdPointer = cmdList.length - 1;
        em_terminalInput.value = cmdList[cmdPointer];
    }
    if (e.key == 'ArrowDown' && cmdList.length > 0) {
        cmdPointer++;
        if (cmdPointer > cmdList.length - 1)
            cmdPointer = 0;
        em_terminalInput.value = cmdList[cmdPointer];
    }
});
This code connected our HTML form to an event listener that submitted the data to the server and handled the response. The PHP on the receiving side looked like this:
<?php

require "../vendor/autoload.php";

$raw = file_get_contents("php://input");
$data = json_decode($raw, 1);

// special echo case for testing
$echo = '';
if (preg_match('/^ *echo +(.*)$/i', $data['text'], $match)) {
    $echo = $match[1];
}

$transcript = '';
$lex = null;
if ($echo) {
    $message = $echo;
} else {
    $textInquiry = new \Ada\TextInquiry($data['text'], $data['clientId']);
    $message = $textInquiry->getMessage();
    $transcript = $textInquiry->getTranscript();
    $lex = $textInquiry->getLexData();
}

$packet = new \Ada\Packet();
$packet->put($message, 'neutral', 'Query');

echo json_encode([
    'receipt' => $data,
    'lex' => $lex,
    'lexPretty' => json_encode([
        'transcript' => $transcript,
        'response' => $message,
        'echo' => $echo,
    ], JSON_PRETTY_PRINT)
]);
In this lifecycle you can see the PHP using our TextInquiry class to send information to Lex
and responding with a success message. This operation was synchronous meaning we returned our
response from Lex back immediately.
It also creates a Packet() instance with the message contents from Lex which we will explore
later and facilitates tOSty's ability to speak to us over websockets.
Synchronous Microphone and Audio Submission
Similar to the Text submission we could submit Audio but required integrating with the browsers API to record information from the microphone and process it into a WAV file.
Here is the JavaScript used to listen to the microphone:
/// RECORDER BUTTON
var recordingState = "init";
var stopped = false;
var isRecording = false;

// Wire up record button in UI to start recording audio from microphone
var em_recordButton = document.getElementById("record");
em_recordButton.addEventListener("click", function() {
    switch (recordingState) {
        default:
        case "init":
            // start recording
            recordingState = "recording";
            em_recordButton.innerHTML = "Stop";
            em_recordButton.classList.add("listening");
            startRecording();
            break;
        case "recording":
            // stop recording, start processing
            recordingState = "processing";
            em_recordButton.innerHTML = "Processing";
            em_recordButton.disabled = true;
            em_recordButton.classList.remove("listening");
            stopRecording();
            break;
    }
});

function endProcessing() {
    recordingState = "init";
    em_recordButton.disabled = false;
    em_recordButton.innerHTML = "Listen";
}

function stopRecording() {
    isRecording = false;
}

function startRecording() {
    isRecording = true;
    stopped = false;
    // Take a stream of bytes and store it in a blob
    const recordMic = function(stream) {
        const options = {mimeType: 'audio/webm'};
        const recordedChunks = [];
        const mediaRecorder = new MediaRecorder(stream, options);

        mediaRecorder.addEventListener('dataavailable', function(e) {
            if (e.data.size > 0) {
                recordedChunks.push(e.data);
            }
            if(isRecording === false && stopped === false) {
                mediaRecorder.stop();
                stopped = true;
            }
        });

        mediaRecorder.addEventListener('stop', function() {

            // convert our array of audio chunks into a blob file
            let blob = new Blob(recordedChunks);
            let reader = new FileReader();
            reader.readAsDataURL(blob);

            // once blob is made send it to the server
            reader.onload = function() {
                let data = {
                    clientId: clientId,
                    blob: reader.result.replace(/.*base64[,]/, '')
                };

                // send blob to server with ajax
                ajax("POST", "request-submit-blob.php", data, true, function(status, responseText) {
                    try {
                        var response = JSON.parse(responseText);
                        switch (status) {
                            case 200:
                                if (response == null)
                                    return;
                                // handle response from server
                                logData("LexResponse", response.lexPretty);
                                // change mic button state
                                endProcessing();
                                break;
                            default:
                                console.warn(status, response);
                                break;
                        }
                    } catch (e) {
                        console.warn(status, responseText, e);
                    }
                }.bind(this));
            };
        });

        mediaRecorder.addEventListener('onerror', function(e) {
            console.log("Error", e);
        });

        mediaRecorder.start(1000); // 1 second chunks
    }
    navigator.mediaDevices.getUserMedia({ audio: true, video: false }).then(recordMic);
}
This code is much more advanced than the text submission logic. It essentially does these things:
- Wire up the microphone recording request for the browser to an HTML button to start and stop recording when pressed.
- Start the recording and while in progress receive binary data in 1 second chunks stored in a local array.
- Once recording is stopped convert the array of chunks of binary audio into a single blob file.
- Submit that blob file to the server ad a dedicated
request-submit-blob.phpvia AJAX.
The request-submit-blob.php endpoint in PHP performs the following:
<?php

require "../vendor/autoload.php";

$raw = file_get_contents("php://input");
$data = json_decode($raw, 1);

$audioBlob = base64_decode($data['blob']);
$audioInquiry = new \Ada\AudioInquiry($audioBlob, $data['clientId']);

$packet = new \Ada\Packet();
$packet->put($audioInquiry->getMessage(), 'neutral', 'Query');

echo json_encode([
    'receipt' => $data,
    //'sizeRaw' => filesize("/tmp/recording.wav"),
    //'sizeDS' => filesize("/tmp/recordingdownsampled.wav"),
    'lex' => $audioInquiry->getLexData(),
    'lexPretty' => json_encode([
        'transcript' => $audioInquiry->getTranscript(),
        'response' => $audioInquiry->getMessage(),
    ], JSON_PRETTY_PRINT)
]);
Similar to our Text Submission processing this one takes the submitted Blob data and supplies it to our AudioInquiry class that
we already covered. This class then converts it to the proper WAV format and submits it off to AWS Lex and synchronously
awaits the reply from Lex to provide back to the front end for response processing.
It also creates a Packet() instance with the message contents from Lex which we will explore
later and facilitates tOSty's ability to speak to us over websockets.
$packet = new \Ada\Packet();
$packet->put($message, 'neutral', 'Query')
Handing Lex Responses
Now that we have our submission logic in place for text or audio commands lets look at how our client code handles and presents those to our user. These responses include no audio data to make our bot actually speak to us but are purely the data and textual responses from Lex.
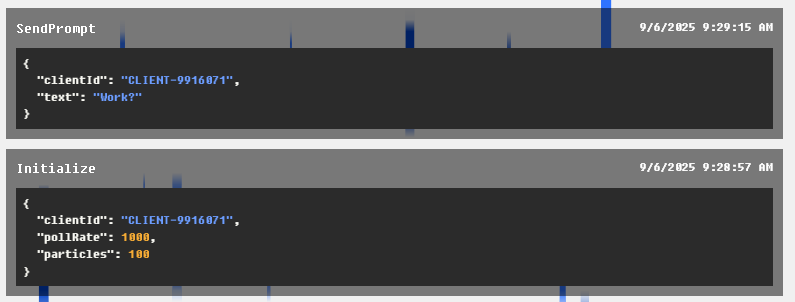
In both our text and audio responses we trigger a function called logData() that renders out the
data to the front end in the left side panel:
function rehighlight() {
    hljs.initHighlighting.called = false;
    hljs.initHighlighting();
}

function logData(title, data) {
    if (typeof data != 'string')
        data = JSON.stringify(data, null, 2);
    let html = '';
    let timestamp = new Date();
    timestamp = timestamp.toLocaleDateString() + ' ' + timestamp.toLocaleTimeString();
    html += '<div class="log-title"><div class="codetitle">' + title + '</div><div class="timestamp">' + timestamp + '</div></div>';
    html += '<code id="lexdata" class="json">' + ( data ? data : 'null' ) + '</code>';
    let em = document.createElement('pre');
    em.innerHTML = html;
    em_codeLog.insertAdjacentElement('afterbegin', em);

    // remove all elements after 20
    if (em_codeLog.children.length > 30) {
        em_codeLog.removeChild(em_codeLog.children[em_codeLog.children.length - 1]);
    }

    rehighlight();
}
This function takes the data from the response, adds some data like a timestamp to it then outputs its JSON in a pretty format on the left panel.
It uses hljs for its pretty rendering of JSON data. The output looks like the following.
Getting tOSty to Talk
As of this point our application is function regarding processing natural language into commands that trigger lambda functions and output the responses to the client. However tOSty is just window dressing and has no spark of life. To facilitatate this we want tOSty to be capable of:
- Speaking to us with audio and subtitles.
- Animating his mouth in sync with the audio.
In the following sections we will wire up websockets to receive audio transmissions from our server using websockets that pick up
the results of our Packet instances we fired off from our requests.
The Packet Class and AWS Polly
As we saw in our text and audio submission endpoints we created a Packet instance that act as an asynchrononus request to create
an audio output of our Lex response messages.
$packet = new \Ada\Packet();
$packet->put($audioInquiry->getMessage(), 'neutral', 'Query');
Lets take a closer look at this class.
<?php

namespace Ada;

class Packet
{
    public function __construct()
    {
        $this->file = "/tmp/ada-data.json";
    }

    public function put($text, $emotion, $type = null, $data = null)
    {
        $packet = [
            'text' => $text,
            'emotion' => $emotion,
        ];
        if ($type) {
            $packet['type'] = $type;
        }
        if ($data) {
            $packet['data'] = $data;
        }
        file_put_contents($this->file, json_encode($packet));
    }

    public function get()
    {
        $data = json_decode(trim(file_get_contents($this->file)), 1);
        file_put_contents($this->file, "");

        return $data;
    }
}
This class function put() takes the text from our Lex bot response (or any message we want to send from the server to the client)
and stores it in a local tmp file /tmp/ada-data.json.
It also supplies a get() function that reads the data in the temp file and deletes it, acting essentially as a message transmission
from any code that instantiates a packet and any code that wants to receive a packet.
Keep this operation in mind as we move forward to see how its utilized but before we do so lets set up the communication channel between our browser client and server that can receive server events and output to the user.
Websocket Client
To recieve random and asynchronous events from the server in our browser client we will set up a websocket connection to the server which listens for packets. In the event the websocket is not functional we can fallback to AJAX based polling for redundancy.
The front end initiated the websocket connection in JavaScript:
/// WEBSOCKET CONNECTION
var connectionStrategy;
var conn;
function establishWebsocket() {
    // attempt to (re)connect to websocket if we are currently polling
    if (connectionStrategy == 'websocket')
        return;

    try {
        // readyStates:
        // CONNECTING = 0
        // OPEN = 1
        // CLOSING = 2
        // CLOSED = 3
        if (conn && conn.readyState == conn.CONNECTING)
            return;

        // Establish our websocket connection to our server
        conn = new WebSocket('wss://www.jordansavant.com/wss2/');
        conn.onopen = function(e) {
            console.log("Connection established!");
            connectionStrategy = 'websocket';
        };

        // If our socket closes we can fallback to the polling strategy
        conn.onclose = function(e) {
            console.log("Connection closed!");
            connectionStrategy = 'polling';
        }

        // When we receive a packet from the server
        conn.onmessage = function(e) {
            processCommunication(e.data);
        };

        // If our socket encounters an error fallback to polling strategy
        conn.onerror = function(e) {
            console.warn("websocket error", e);
            connectionStrategy = 'polling';
        }
    } catch (err) {
        console.warn("Unable to connect to websocket", err);
        connectionStrategy = 'polling';
    }
}

// start and reattempt websocket periodically for redunancy
window.setInterval(establishWebsocket, 1000);
As you can see there was redundancy that fell back to AJAX polling if the websocket failed. This was completed with:
/// POLLING LOOP
window.setInterval(function() {
    if (connectionStrategy != 'polling')
        return;

    ajax("POST", "request-poll.php", {}, true, function(status, responseText) {
        try {
            switch (status) {
            case 200:
                processCommunication(responseText);
                break;
            default:
                console.warn(status, response);
                break;
            }
        } catch (e) {
            console.warn(status, responseText, e);
        }
    }.bind(this));
}, pollRate);
The response output for both polling and websocket handed to the same function processCommunication() which we
will explore later on.
Websocket Server
Now that we have established our websocket connection from the client we need our server capable of handling these connections and facilitating the communication with our AWS Lex bot.
I chose to use the PHP Ratchet Framework to operate as our server we could run on port 9000 to handle connections.
But before we could code our PHP server we needed to proxy over the connection from Apache which
was our primary webhosting software to this local process running on port 9000. This could be
accomplished rather trivially with mod-proxy and mod-proxy_wstunnel.
Under apache virtualhost entry for the receiving domain we could tell Apache to proxy over all input and output packets on the websocket to our ratchet server port.
# Proxy WebSocket traffic from /websocket-path/ to a backend WebSocket server
ProxyPass "/wss2/" "ws://localhost:9000/wss2/"
ProxyPassReverse "/wss2/" "ws://localhost:9000/wss2/"
With that out of the way we could build our PHP Ratchet server software. All dependencies were managed with
PHP Composer. Our server.php script when ran on CLI or via process on server would do the following:
<?php

use Ratchet\Server\IoServer;
use Ratchet\Http\HttpServer;
use Ratchet\WebSocket\WsServer;
use Ada\Chat;

require "vendor/autoload.php";

// Create our Ratchet event loop to run in perpetuity at a certain interval (similar to a video game)
$loop = React\EventLoop\Factory::create();

// Our server logic lives in the Ada\Chat class
$chat = new Chat();

// Set up our WebSocket server for clients wanting real-time updates
$webSock = new React\Socket\Server('0.0.0.0:9000', $loop); // Binding to 0.0.0.0 means remotes can connect
$webServer = new Ratchet\Server\IoServer(
    new Ratchet\Http\HttpServer(
        $wsServer = new Ratchet\WebSocket\WsServer(
            $chat
        )
    ),
    $webSock
);
$wsServer->enableKeepAlive($loop, 3);

// Periodically listen to communications from socket and send back responses to connected clients
$loop->addPeriodicTimer(.25, function() use ($chat) {
    echo ".";
    $r = new \Ada\Requests\RequestCommunication();
    if ($r->hasResponse()) {
        echo "+";
        $chat->broadcast($r->getResponse());
    }
});

// Start the server
$loop->run();
When running via CLI it outputs a . every tick and + whenever output is sent back the browser client.
$ php server.php
Server Start
.................+......+...
ADA Chat Code
Originally tOSty was called "ADA" which is why our namespaces are designated as such. Lets take a look
at our ADA\Chat class that houses all of our processing logic for the server.
In this class we implement the actual interface Ratchet requires to provide the input and output of the data on the socket. The core of this class completes the following:
onOpen()adds the incoming websocket connection to a list of connected clients allowing us to actually support multiple users connected to the same server.onClose()removes the connection from the client list.onMessage()lets one connected websocket send information to other connected clients (not used).broadcast()sends a packet of information to all connected clients.
<?php

namespace Ada;

use Ratchet\MessageComponentInterface;
use Ratchet\ConnectionInterface;

class Chat implements MessageComponentInterface
{
    protected $clients;

    public function __construct()
    {
        $this->clients = new \SplObjectStorage;
        echo "Server Start\n";
    }

    public function onOpen(ConnectionInterface $conn)
    {
        // Store the new connection to send messages to later
        $this->clients->attach($conn);
        echo "New connection! ({$conn->resourceId})\n";
    }

    public function onMessage(ConnectionInterface $from, $msg)
    {
        $numRecv = count($this->clients) - 1;
        echo sprintf('Connection %d sending message "%s" to %d other connection%s' . "\n", $from->resourceId, $msg, $numRecv, $numRecv == 1 ? '' : 's');

        foreach ($this->clients as $client) {
            if ($from !== $client) {
                // The sender is not the receiver, send to each client connected
                $client->send($msg);
            } else {
                $client->send("echo: $msg");
            }
        }
    }

    public function broadcast($data)
    {
        foreach ($this->clients as $client) {
            $client->send(json_encode($data, JSON_PRETTY_PRINT));
        }
    }

    public function onClose(ConnectionInterface $conn)
    {
        // The connection is closed, remove it, as we can no longer send it messages
        $this->clients->detach($conn);
        echo "Connection {$conn->resourceId} has disconnected\n";
    }

    public function onError(ConnectionInterface $conn, \Exception $e)
    {
        echo "An error has occurred: {$e->getMessage()}\n";
        $conn->close();
    }
}
This class really is just the communication class that is generic on how to send and receive messages across the websocket.
For tOSty specifically we are only using websockets to send data from the server to the client and not receive data (thats handled
from the HTTP post operations already described.) As a result we will primarily only use the broadcast() function for our application.
Sending tOSty's Audio to the Client
As we talked about earlier we wanted tOSty to feel alive and to do so we want him to talk to us. We already saw how with each
Text and Audio submission we are creating a Packet class with the Lex Bot responses. Lets take a closer look at our server code
and see how those Packets are picked up and converted into Audio and sent to the clients.
In the server.php file there was this line in our processing loop:
$r = new \Ada\Requests\RequestCommunication();
if ($r->hasResponse()) {
    $chat->broadcast($r->getResponse());
}
Lets take a look at the RequestCommunication class and see what it is doing:
<?php

namespace Ada\Requests;

class RequestCommunication
{
    // Process a request for a new communication for the front end
    public function __construct()
    {
        $packet = new \Ada\Packet();
        $this->data = $packet->get();
        if ($this->data)
            $this->voice = new \Ada\Voice($this->data['text']);
    }

    private $data, $voice;

    public function hasResponse()
    {
        return !empty($this->data);
    }

    public function getResponse()
    {
        if (empty($this->data))
            return null;

        return [
            'receipt' => $this->data,
            'raw' => base64_encode($this->voice->getAudioContents()),
            'speechmarks' => $this->voice->getSpeechMarks(),
            'input' => $this->data,
            'inputJson' => json_encode($this->data, JSON_PRETTY_PRINT),
        ];
    }
}
Aha! We now see where we are reading from the Packet data stored in our temporary file.
In this class we read the packet text and pass it off to a Voice class we have built then provide
a getResponse() message that will provide back an object with the speech result in it that we saw
ultimately get passed to the websocket clients through the broadcast() function.
Here is the Voice class:
<?php

namespace Ada;

class Voice
{
    public function __construct($text)
    {
        $this->text = $text;

        $clientPolly = new \Aws\Polly\PollyClient([ 'version' => 'latest', 'region' => 'us-east-1' ]);

        // Audio
        $audioResult = $clientPolly->synthesizeSpeech([
            'OutputFormat' => 'mp3',
            'Text' => $this->text,
            'TextType' => 'text',
            //'VoiceId' => 'Salli'
            'VoiceId' => 'Joey'
        ]);
        $this->audioContents = $audioResult->get('AudioStream')->getContents();

        // Speech Marks
        $speechMarksResult = $clientPolly->synthesizeSpeech([
            'OutputFormat' => 'json',
            'SpeechMarkTypes' => ['sentence', 'word', 'viseme'],
            'Text' => $this->text,
            'TextType' => 'text',
            //'VoiceId' => 'Salli'
            'VoiceId' => 'Joey'
        ]);

        $this->speechMarks = explode("\n", trim($speechMarksResult->get('AudioStream')->getContents()));
        $this->speechMarks = array_map(function($e) {
            return json_decode($e, 1);
        }, $this->speechMarks);
    }

    public function getAudioContents()
    {
        return $this->audioContents;
    }

    public function getSpeechMarks()
    {
        return $this->speechMarks;
    }
}
In this class we use a new AWS service called "Polly" that takes any text data and converts it into an audio format that is returned to us. In addition Polly also returns us "speechmarks" also known as "visemes" which are the actual mouth movements associated with each consonant and vowel in the word expressed.
This class takes the packet's text data, sends it to Polly to create the audio speech from using a voice called "Joey"
then stores it in the audioContents. It also makes a request to turn the same text int a list of speechmarks for our
animations in the client.
Ultimately this audio data is broadcasted back to the browser for processing.
Playing the Speech
Heading back over to our client code lets look at how it processes this response using our processCommunication()
function we were hinted at before:
/// RECEIVE COMMUNICATIONS
var startSnooze = 20; // 8pm hours
var snoozeLength = 12; // to 8am
var endSnooze = startSnooze + snoozeLength;
endSnooze = endSnooze > 24 ? endSnooze - 24 : endSnooze;
function isSnoozed() {
    var hours = (new Date()).getHours();
    if (endSnooze < startSnooze) { // wraps midnight
        return hours > startSnooze || hours < endSnooze;
    }
    return (hours > startSnooze && hours < endSnooze);
}

function processCommunication(responseText) {
    var response = JSON.parse(responseText);
    if (response == null)
        return;

    console.log("COMMUNICATION", response);
    logData(response.input.type, response.input);

    var msbuffer = 80;
    var src = "data:audio/mp3;base64," + response.raw;
    var audioX = new Audio(src);

    // snooze, no speaking
    if (isSnoozed()) {
        console.log("snoozed");
        return; // cancel out if within snooze window
    }

    audioX.load();
    audioX.onended = function() {
        endAnimation();
    };
    audioX.play().then(function() {
        // speechmarks for sentences
        for (var i=0; i < response.speechmarks.length; i++) {
            var sp = response.speechmarks[i];
            if (sp.type == 'sentence') {
                belaySpeech(sp.value, sp.time + msbuffer);
            }
            if (sp.type == 'viseme') {
                belayAnimation(sp.value, sp.time + msbuffer);
            }
        }
    }, function(error) {
        console.warn("FAILED TO PLAY", error);
        belaySpeech("I am unable to speak until you interact with me.", 0);
        belaySpeech("", 5000);
    });

    activeEmotion = response.input.emotion;
}
The processCommunication() creates an inline Audio instance with the broadcasted raw mp3 data and plays it through the
browsers audio. It also takes the speechmarks and passes them off into two functions belaySpeech and belayAnimation to
make tOSty animate his mouth along with the audio file being played.
/// ANIMATE MOUTH AND SUBTITLES
function belaySpeech(sentence, timeout) {
    window.setTimeout(function() {
        em_subtitles.innerHTML = sentence;
    }, timeout);
}

function belayAnimation(viseme, timeout) {
    // https://docs.aws.amazon.com/polly/latest/dg/ph-table-english-us.html
    var closeMap = ['sil','p','S','T','f','s','u'];
    var openMap = ['k','t','r','a','e','E','i','o','O','u','E'];
    window.setTimeout(function() {
        if (openMap.indexOf(viseme) != -1) {
            // open
            em_adaOpen.style.display = "inline";
            em_adaClosed.style.display = "none";
        } else {
            // closed
            em_adaClosed.style.display = "inline";
            em_adaOpen.style.display = "none";
        }
    }, timeout);
}

function endAnimation() {
    em_adaClosed.style.display = "inline";
    em_subtitles.innerHTML = "";
}
The function belaySpeech() simply renders out the text as a subtitle underneath tOSty while belayAnimation() looks at the
visemes one by one and using their time offset for the audio being output sets a timeout callback to change the animation
of tOSty by changing which image is hidden or shown.
This is where our layer of images for the toaster's presentation comes in (see early part of article) to animate the mouth and facial expressions.
Conclusion
The actual implementation of tOSty involved a few more bells and whistles not presented here:
- Emotions could be conveyed through the
Packetback to the client changing his eye expression and our background canvas. - tOSty also generally animated through hovering and blinking randomly.
This project combined a lot of web-based technology and early AWS services to create a lifelike and fun chat bot capable of calling functions based on our natural language. This all preceded the advent of LLM based AI tools and would need some retooling to utilize these new services in a better way.